Ch00 Class
# 什么是内置类属性
当python创建一个类之后,系统就自带了一些属性,叫内置类属性。这些属性名用双下划线包括并与普通属性名区分。通常的属性包括:
| 属性 | 含义 |
|---|---|
| name | 当前定义的【类】的名字 |
| module | 【类或对象】所属的模块名 |
| dict | 【类或对象】的属性(包含一个字典,由类的数据属性组成) |
| doc | 【类或对象】的文档字符串 - 一般写在class 类下面 |
| base | 当前【类】的父类 |
| bases | 当前【类】所有父类构成的元组 |
# dict 的用法
__dict__可以作用在文件、类或者类的对象上,最终返回的结果为一个字典。
对于类而言,类的静态函数、类函数、普通函数、全局变量以及一些内置的属性都是放在类__dict__里的;对于类的对象而言,对象的__dict__中存储了关于self.xxx变量的信息:
class TestName:
    a = 2
    b = 2

    def __init__(self,c):
        self.a = 0
        self.b = 1
        self.c = c

    def test1(self):
        print("a normal func")

    @staticmethod
    def static_test(self):
        print("a static class")

    @classmethod
    def class_test(self):
        print("a class func")

o = TestName(2)
print(TestName.__dict__)
print(o.__dict__)

结果:
{'__module__': '__main__', 'a': 2, 'b': 2, '__init__': <function TestName.__init__ at 0x000001EFA81DD268>, 'test1': <function TestName.test1 at 0x000001EFA81DD1E0>, 'static_test': <staticmethod object at 0x000001EFA801B390>, 'class_test': <classmethod object at 0x000001EFA801B320>, '__dict__': <attribute '__dict__' of 'TestName' objects>, '__weakref__': <attribute '__weakref__' of 'TestName' objects>, '__doc__': None}
{'a': 0, 'b': 1, 'c': 2}
2
3
4
5
6
7
8
9
10
11
12
13
14
15
16
17
18
19
20
21
22
23
24
25
26
27
28
利用__dict__可以给运行中的对象添加新的属性,接上例:
o.__dict__['new'] =10

结果:
{'a': 0, 'b': 1, 'c': 2, 'new': 10}
2
3
4
# __name__的用法
在很多 Python程序里,经常会看到这样的一段代码:
if __name__ == '__main__':
    main()
2
但很多人对这个内置变量的具体含义并不清楚。作为 Python 的内置变量,__name__变量还是挺特殊的。它是每个 Python 模块必备的属性,但它的值取决于你是如何执行这段代码的。
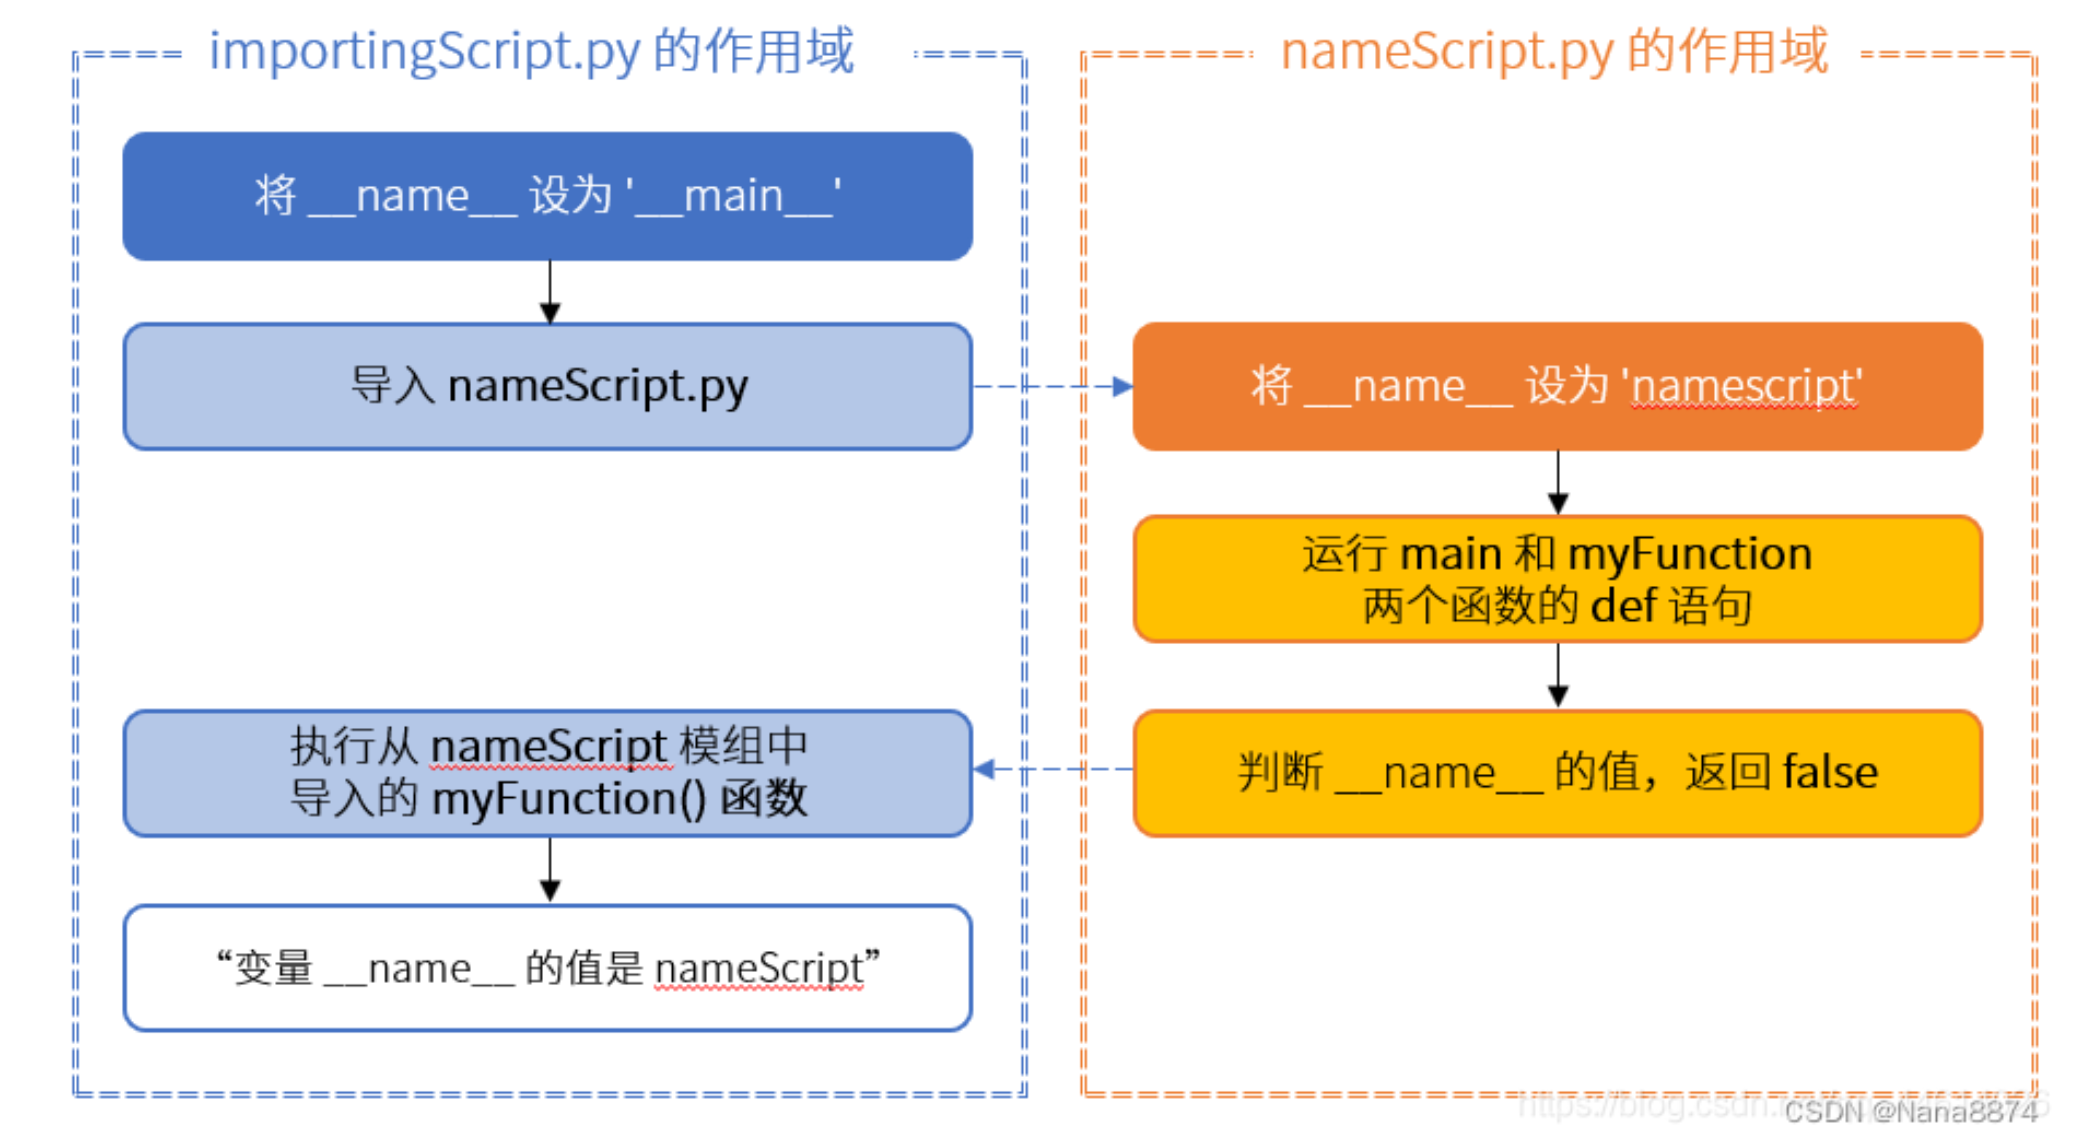
在许多情况下,你的代码不可能全部都放在同一个文件里,或者你在这个文件里写的函数,在其他地方也可以用到。为了更高效地重用这些代码,你需要在 Python 程序中导入来自其他文件的代码。所以,在__name__ 变量的帮助下,你可以判断出这时代码是被直接运行,还是被导入到其他程序中去了。当你直接执行一段脚本的时候,这段脚本的__name__ 变量等于__main__,当这段脚本被导入其他程序的时候__name__ 变量等于脚本本身的名字。
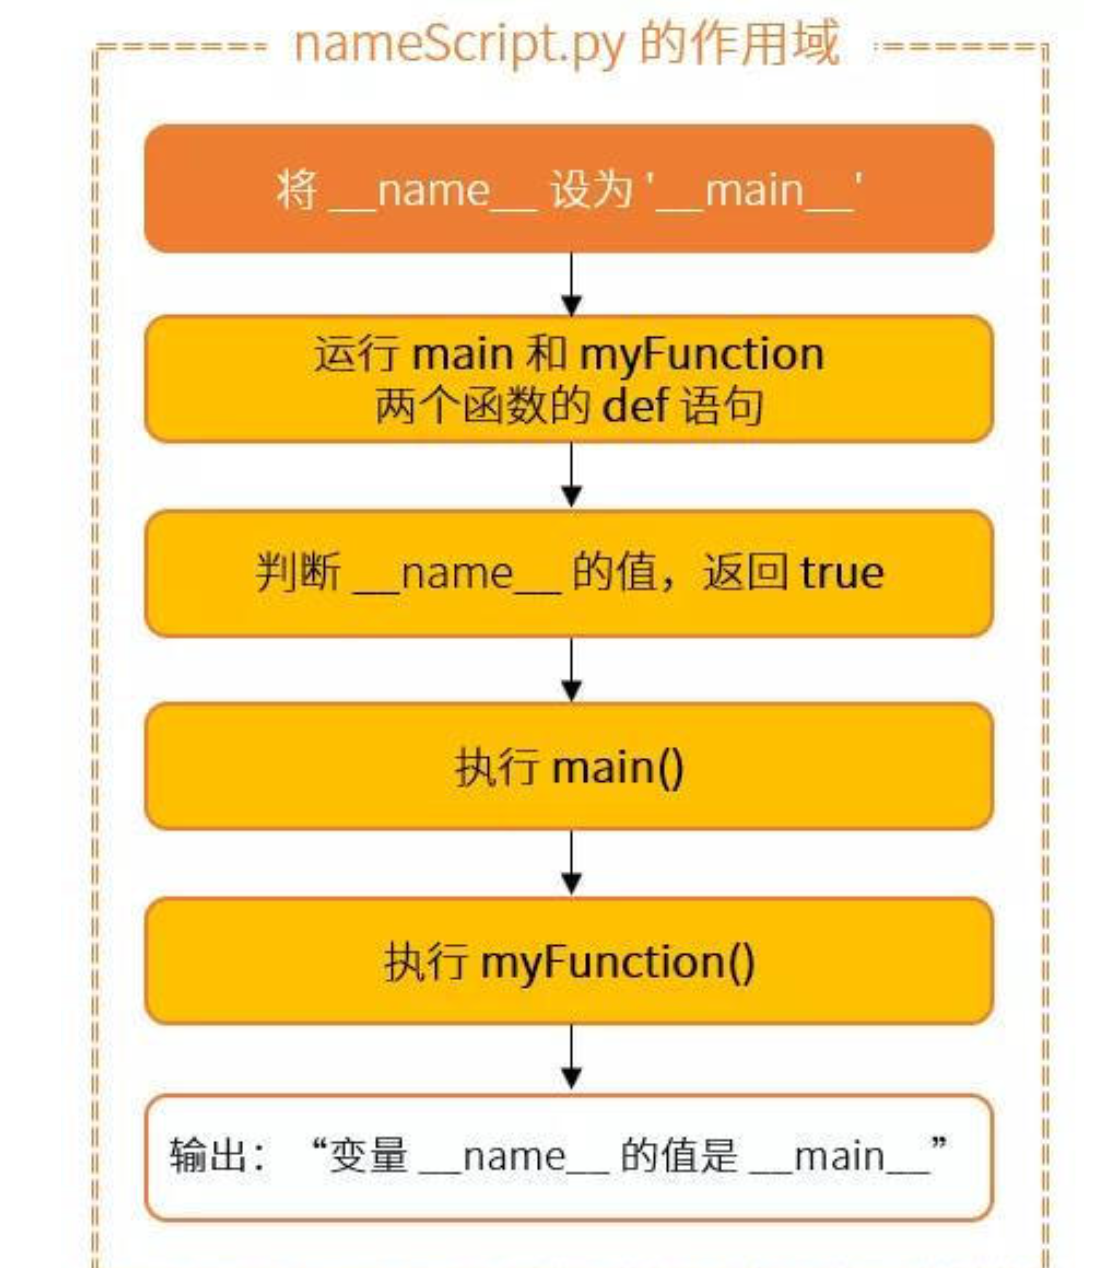
例如,我们有一个脚本名叫nameScript.py
def myFunction():
    print('变量 __name__ 的值是 ' + __name__)

def main():
    myFunction()

if __name__ == '__main__':
    main()

运行结果:
变量 __name__ 的值是 __main__
2
3
4
5
6
7
8
9
10
11
12
新建一个 importingScript.py 文件,将 nameScript.py 作为一个模组导入,重用这个 myFunction() 函数:
#importingScript.py内容

import nameScript as ns
ns.myFunction()

运行结果:
变量 __name__ 的值是 nameScript
2
3
4
5
6
7
8
为什么会出现这个结果?变量的值变成了 nameScript,也就是我们导入的模块的名称。这是因为有了两个不同的作用域:一个是 importingScript 的,一个是 nameScript 的:
# __file__的用法
内置变量__file__比较容易理解,它表示显示文件当前的位置。这里的文件当前位置值得是执行这个脚本时,脚本所在路径相对于执行路径所在的路径。比如有一个脚本test.py在路径/home/user/test/下,如果我们在/home/user/test/下执行:
print(__file__)

运行结果:
test.py
2
3
4
如果我们在/home/user下执行:
print(__file__)

运行结果:
test/test.py
2
3
4
这里要注意,如果执行命令时使用绝对路径,__file__就是脚本的绝对路径。如果使用的是相对路径,__file__就是脚本的相对路径。
另外,在交互式环境中,会爆出异常。因为此时__file__并未生成。使用jupyter时,__file__也是无效的。会报错:name ‘file’ is not defined
由于用__file__来表示文件当前位置会存在绝对路径和相对路径的问题,我们还可以使用sys模块中的sys.argv[0]来表示执行的当前文件所在的路径,这一参数返回当前文件的绝对路径加上文件名。
more: https://blog.csdn.net/amber_o0k/article/details/90737799
ref:https://blog.csdn.net/Nana8874/article/details/126032278
# @classmethod
主要用于扩展类
详见:https://zhuanlan.zhihu.com/p/35643573
# @staticmethod
staticmethod用于修饰类中的方法,使其可以在不创建类实例的情况下调用方法,这样做的好处是执行效率比较高。
详见:https://cloud.tencent.com/developer/article/1597015
注意:
class Foo:
    @classmethod
    def create_one(cls):
        return cls()

    @staticmethod
    def create_two():
        return Foo()


class Bar(Foo):
    pass


bar_one = Bar.create_one()
bar_two = Bar.create_two()
print(isinstance(bar_one, Bar))  # True
print(isinstance(bar_two, Bar))  # False
2
3
4
5
6
7
8
9
10
11
12
13
14
15
16
17
18
# @property
我们可以使用@property装饰器来创建只读属性,@property装饰器会将方法转换为相同名称的只读属性,可以与所定义的属性配合使用,这样可以防止属性被修改。
详见:https://zhuanlan.zhihu.com/p/64487092
# 返回多个参数
python函数返回多个参数实际上是假象,实际上他会作为tuple返回,只不过省略了括号
详见:https://cloud.tencent.com/developer/article/1662984
# lamda匿名函数
lambda arguments: expression
详见:https://www.runoob.com/python3/python-lambda.html
# map函数
map 函数将 lambda 函数作为第一个参数,接收到这个函数对象,并将其应用于第二个参数(即迭代器或序列)的每个元素上。
map(function, iterable, ...)

>>> map(lambda x: x ** 2, [1, 2, 3, 4, 5])  # 使用 lambda 匿名函数
[1, 4, 9, 16, 25]
2
3
4
详见:https://www.runoob.com/python/python-func-map.html
# class基础
详见:https://www.runoob.com/python/python-object.html
# import必须要显示声明才能用
# 正确,输出a,b
from test import A, B


a = A()
b = B()
print("{0},{1}".format(a.name, b.name))


# 错误,找不到A和B
from test import *


a = A()
b = B()
print("{0},{1}".format(a.name, b.name))
2
3
4
5
6
7
8
9
10
11
12
13
14
15
16
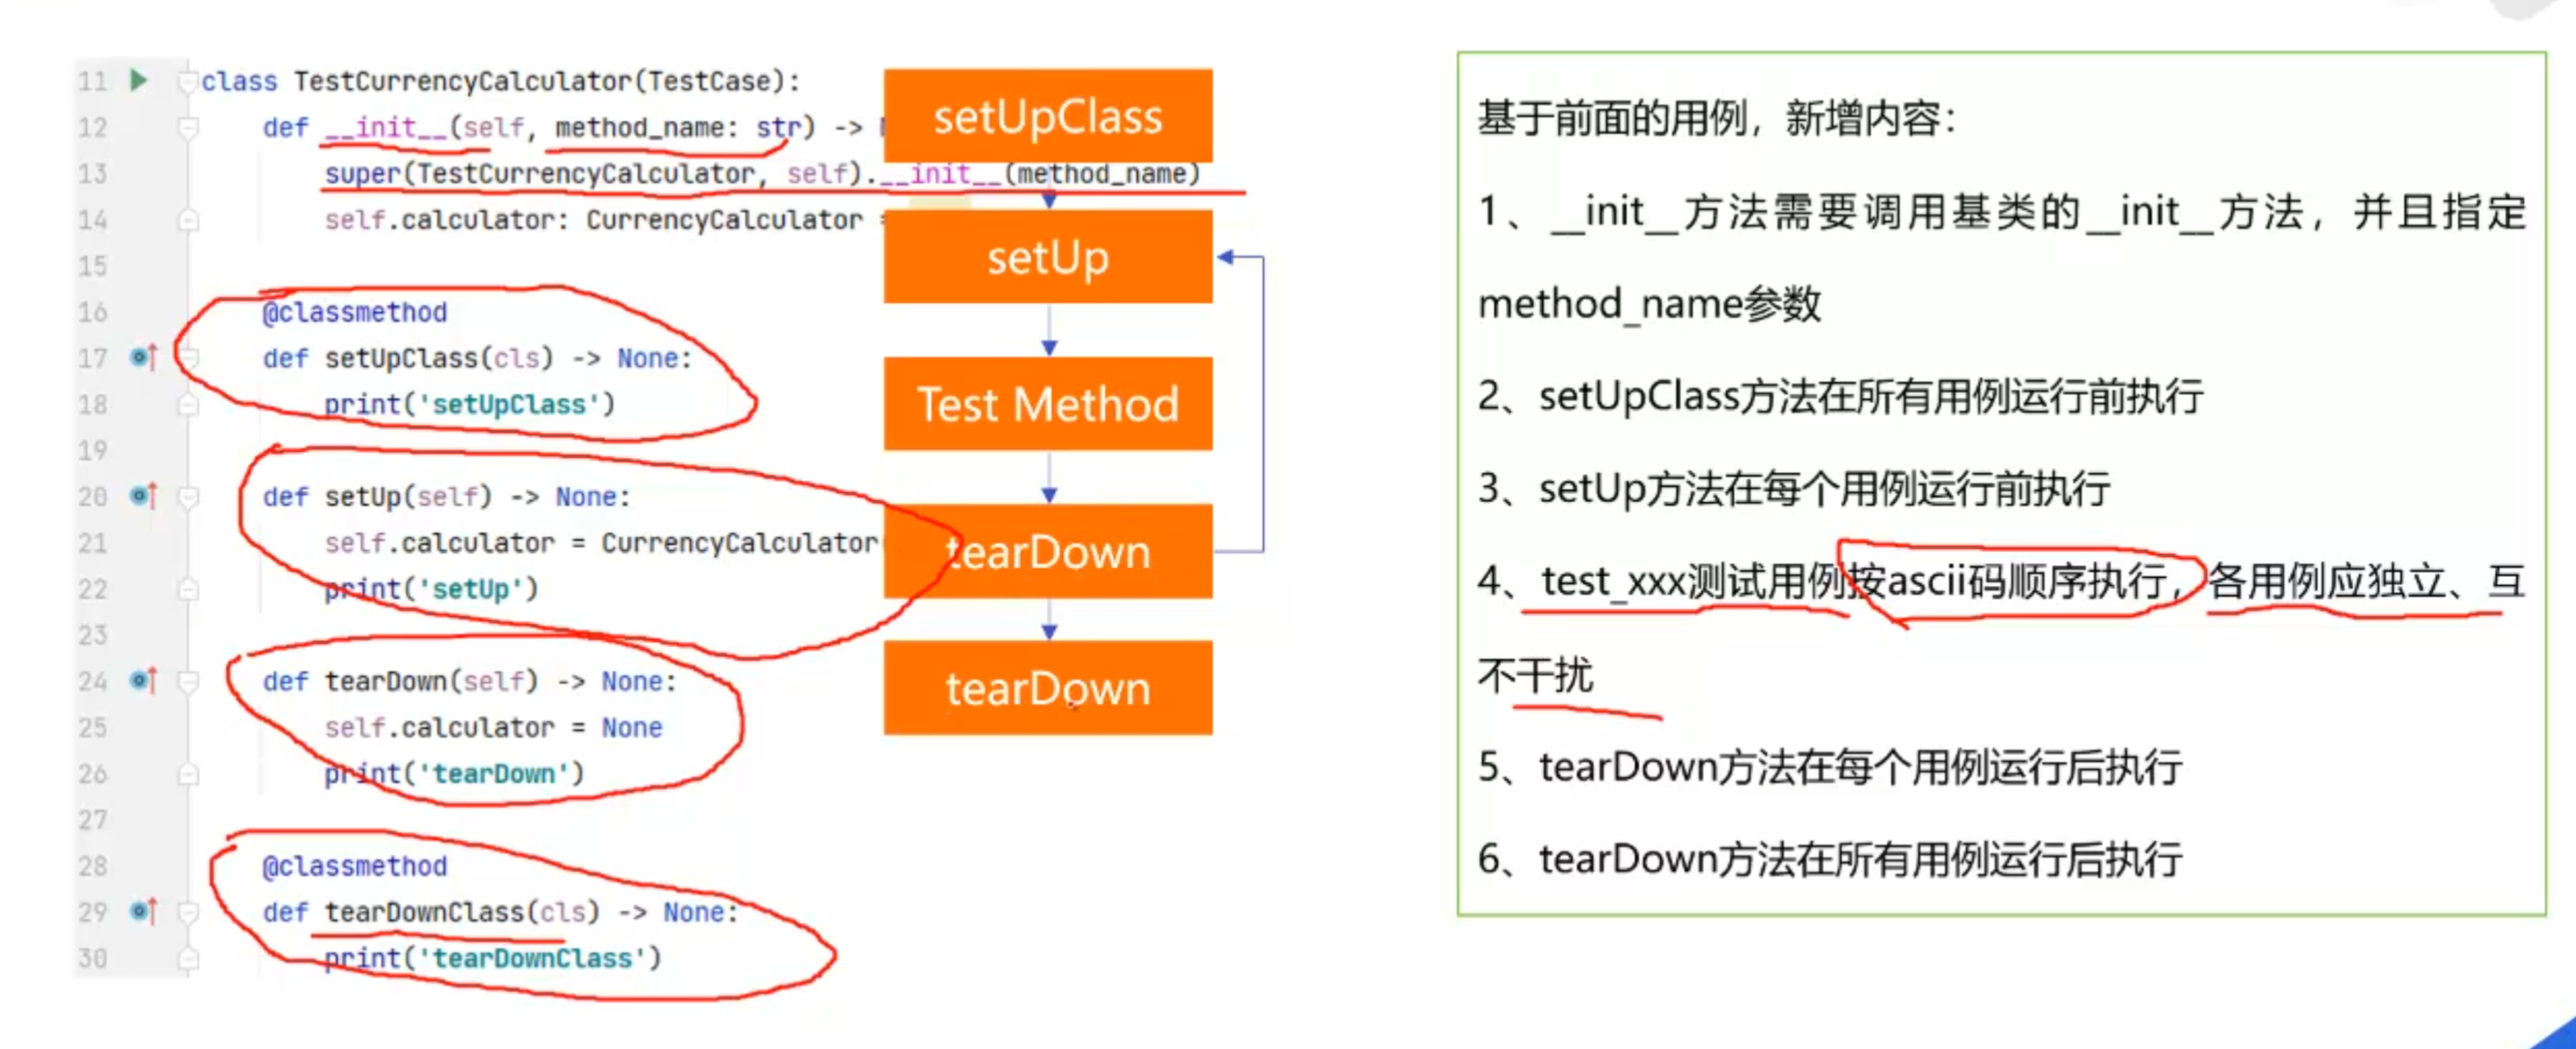
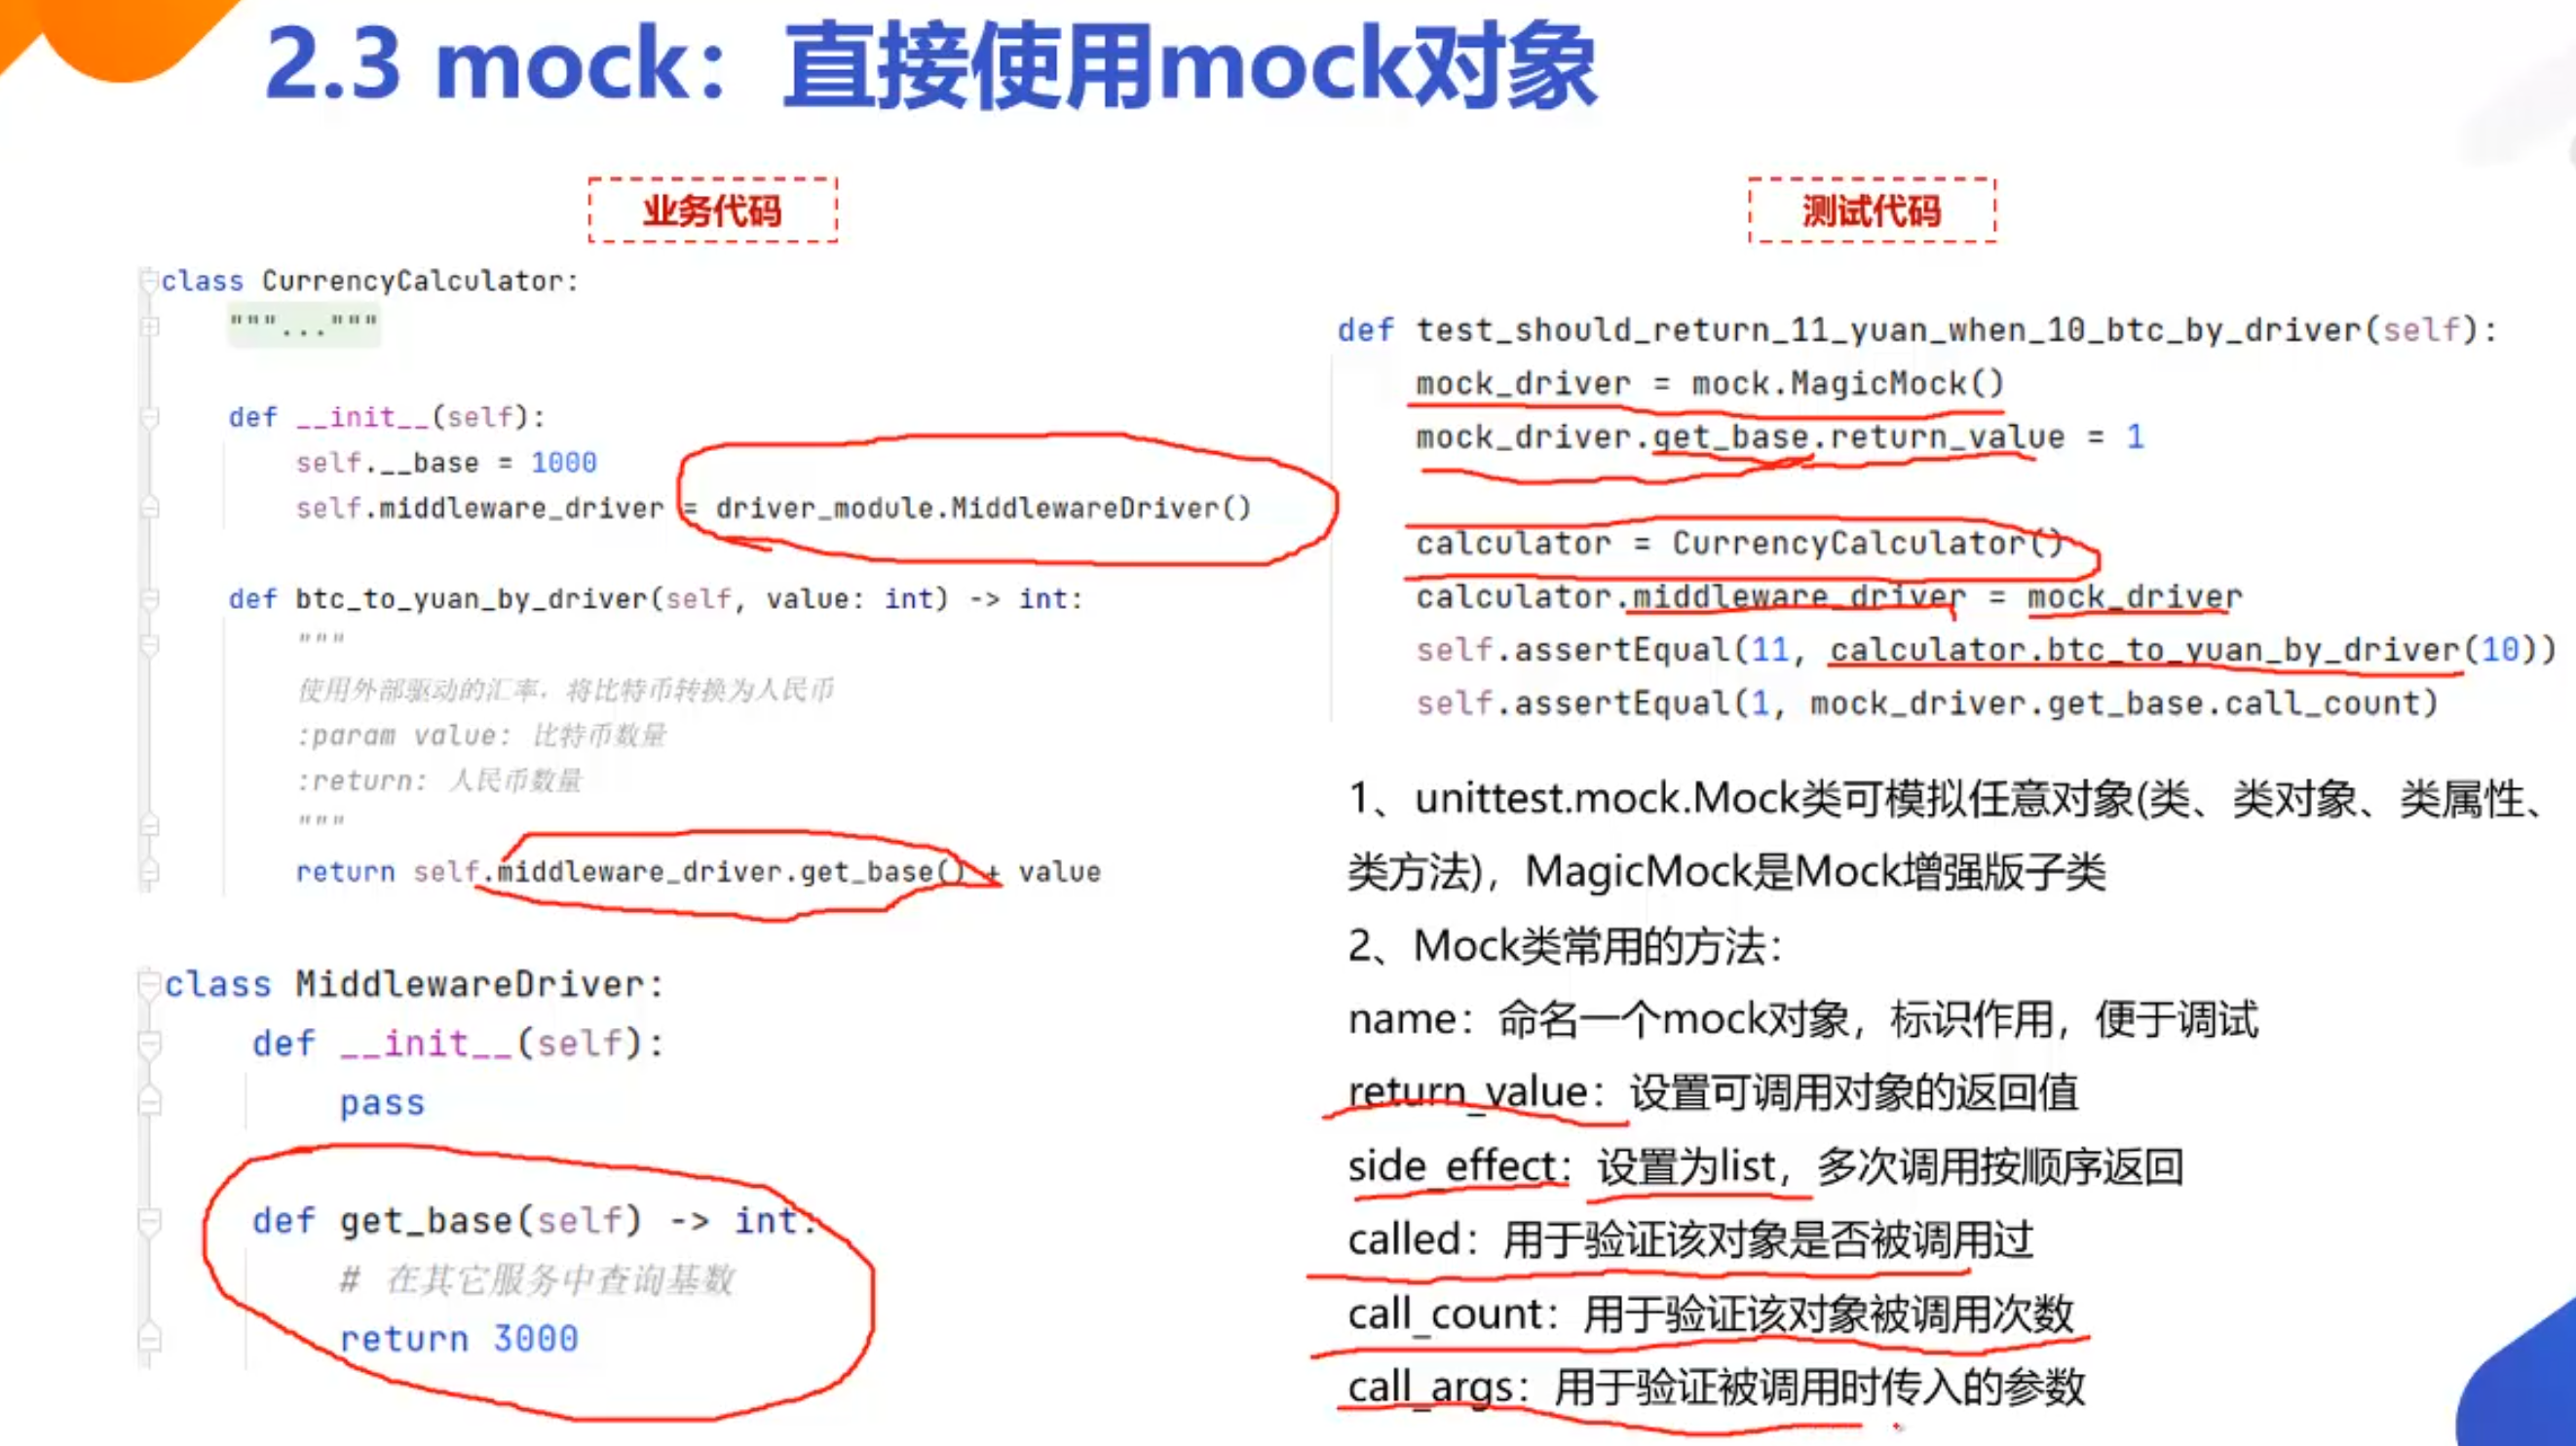
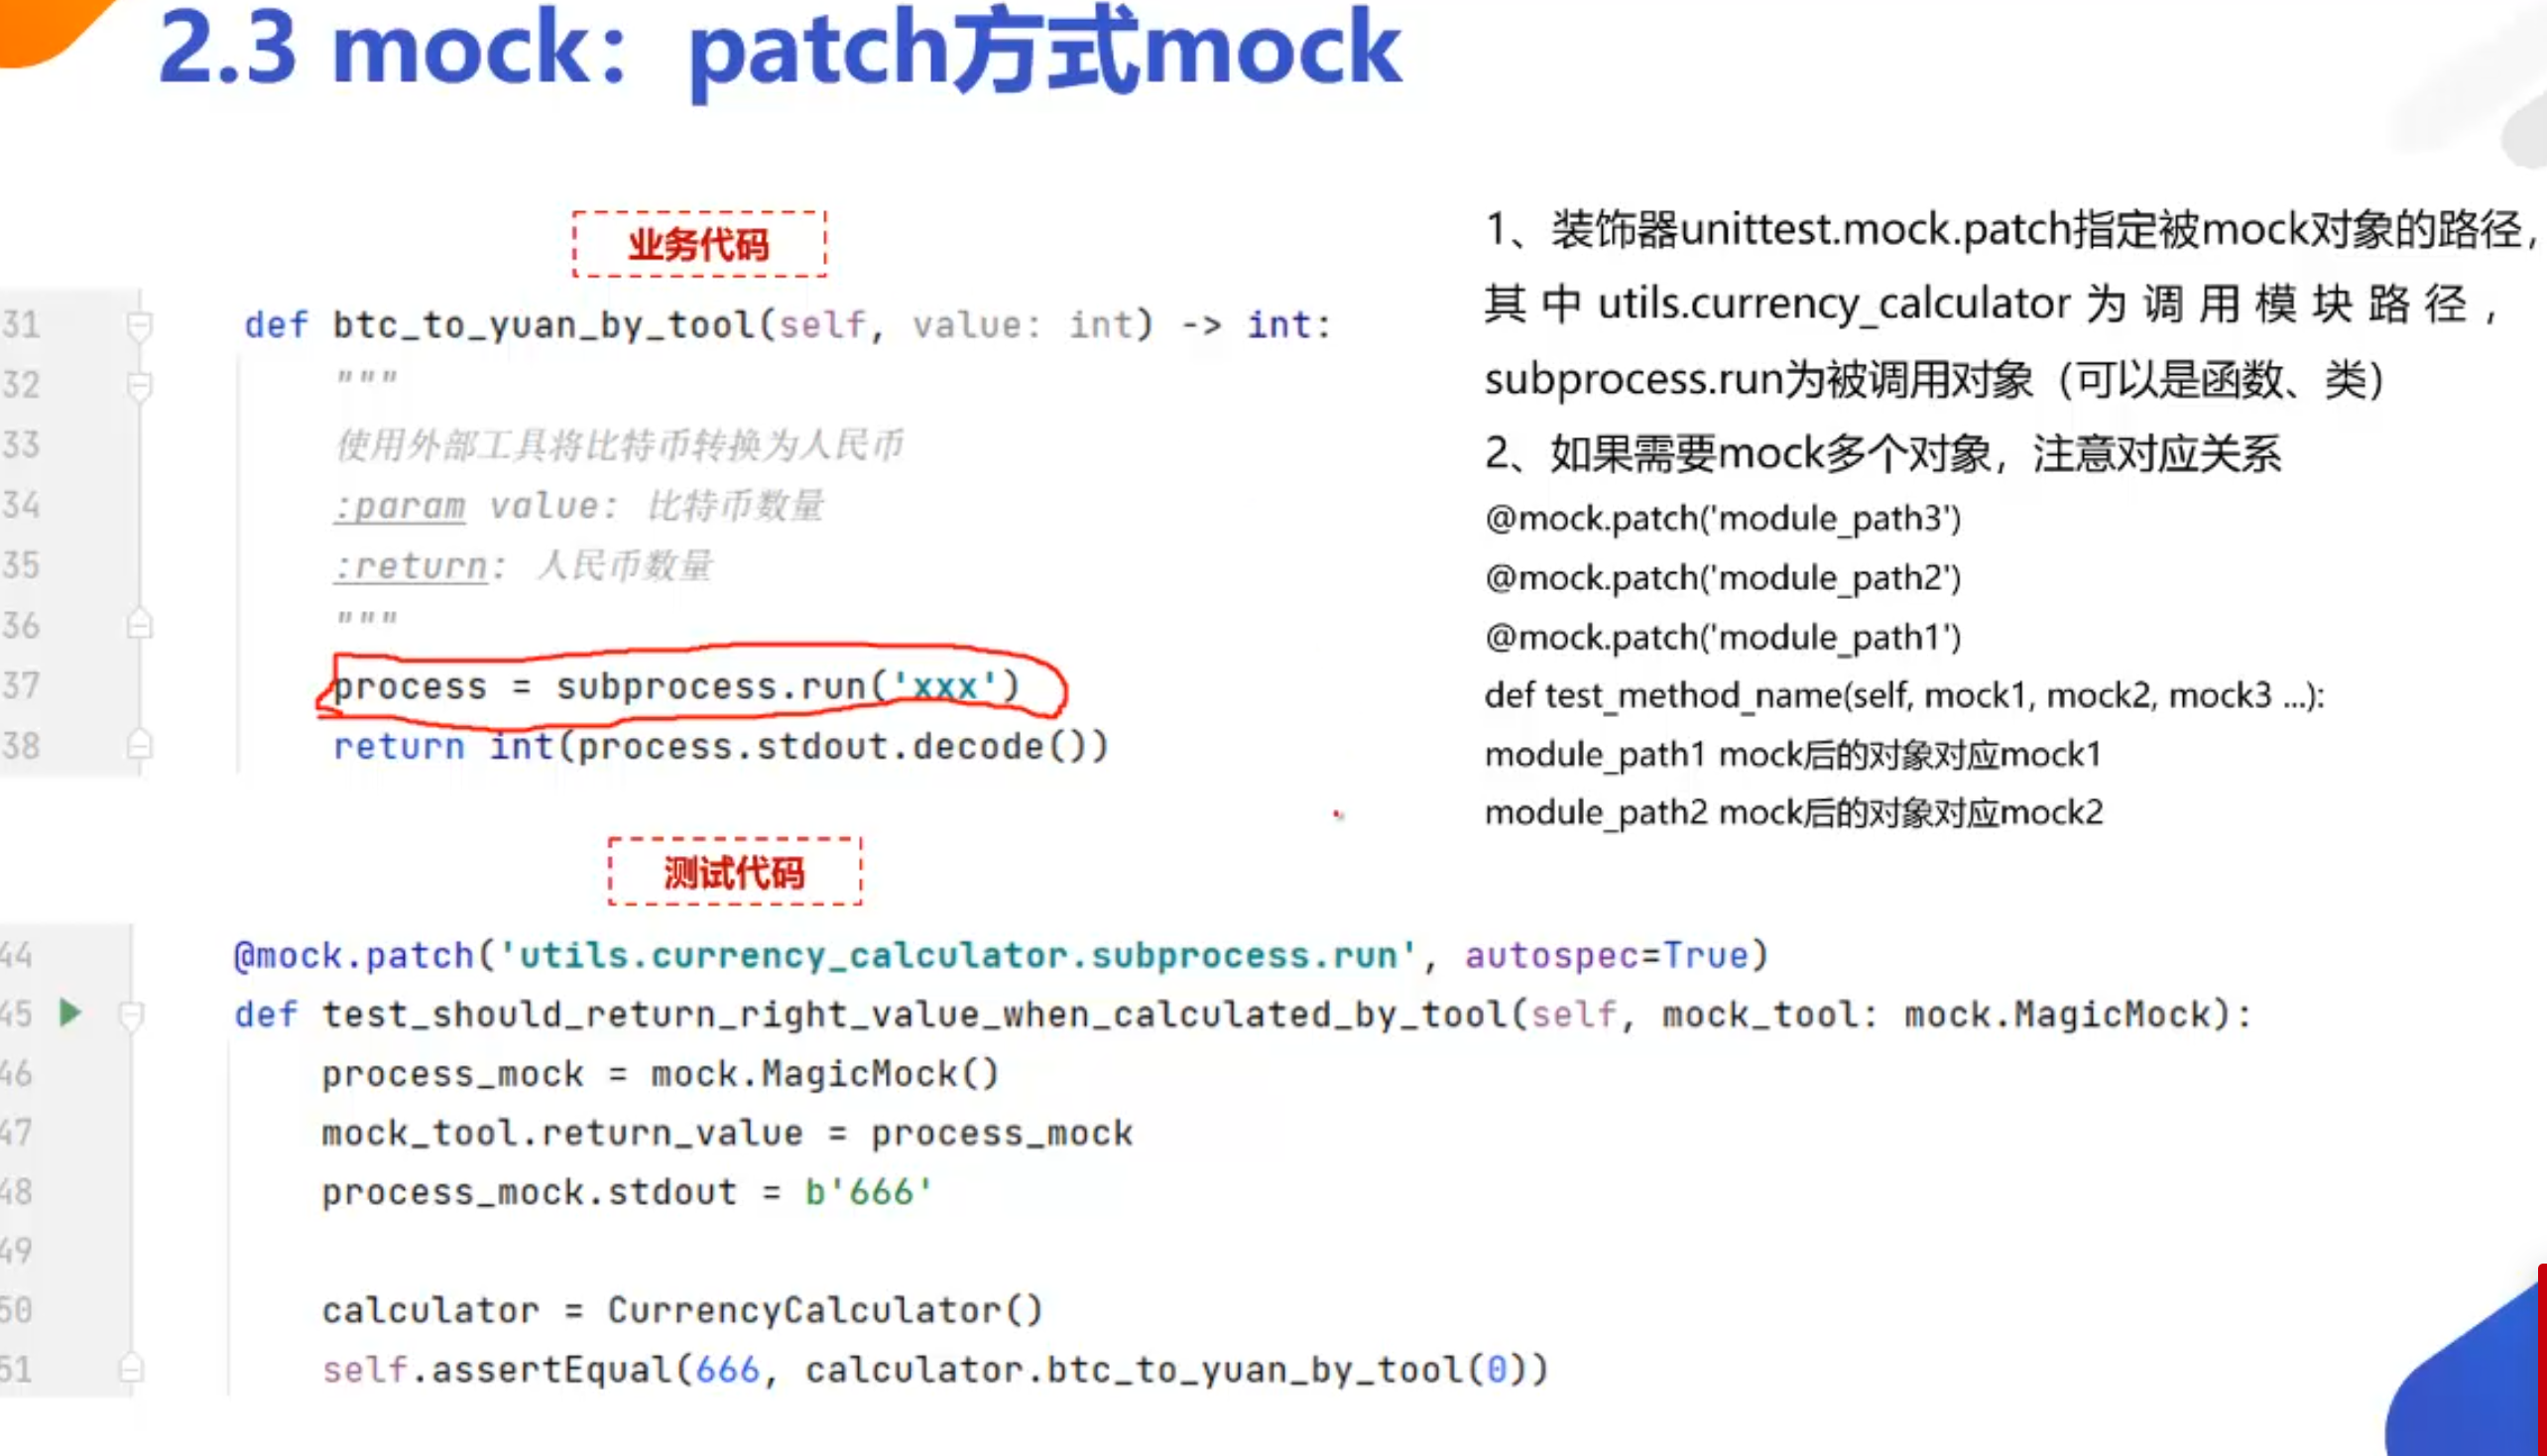
# unittest测试框架
在Python的unittest测试框架中,测试方法的默认命名约定是以test前缀开始。这种命名约定帮助unittest框架识别哪些方法是测试方法,这样它可以自动找到并执行这些测试。
# 默认的命名约定
- 方法名应该以
test开头:这是最基本的约定。框架在运行测试时会自动寻找并执行所有以test开头的方法。这意味着,不以test开头的方法不会被当作测试方法执行。
import unittest

class ExampleTests(unittest.TestCase):
    def test_addition(self):
        self.assertEqual(1 + 1, 2)

    def test_subtraction(self):
        self.assertEqual(2 - 1, 1)
2
3
4
5
6
7
8
# 注意:
如果 or 的第一个操作数是真,则返回第一个操作数;如果第一个操作数是假,则返回第二个操作数。
print(not True or 0) 为什么输出的是0而不是false
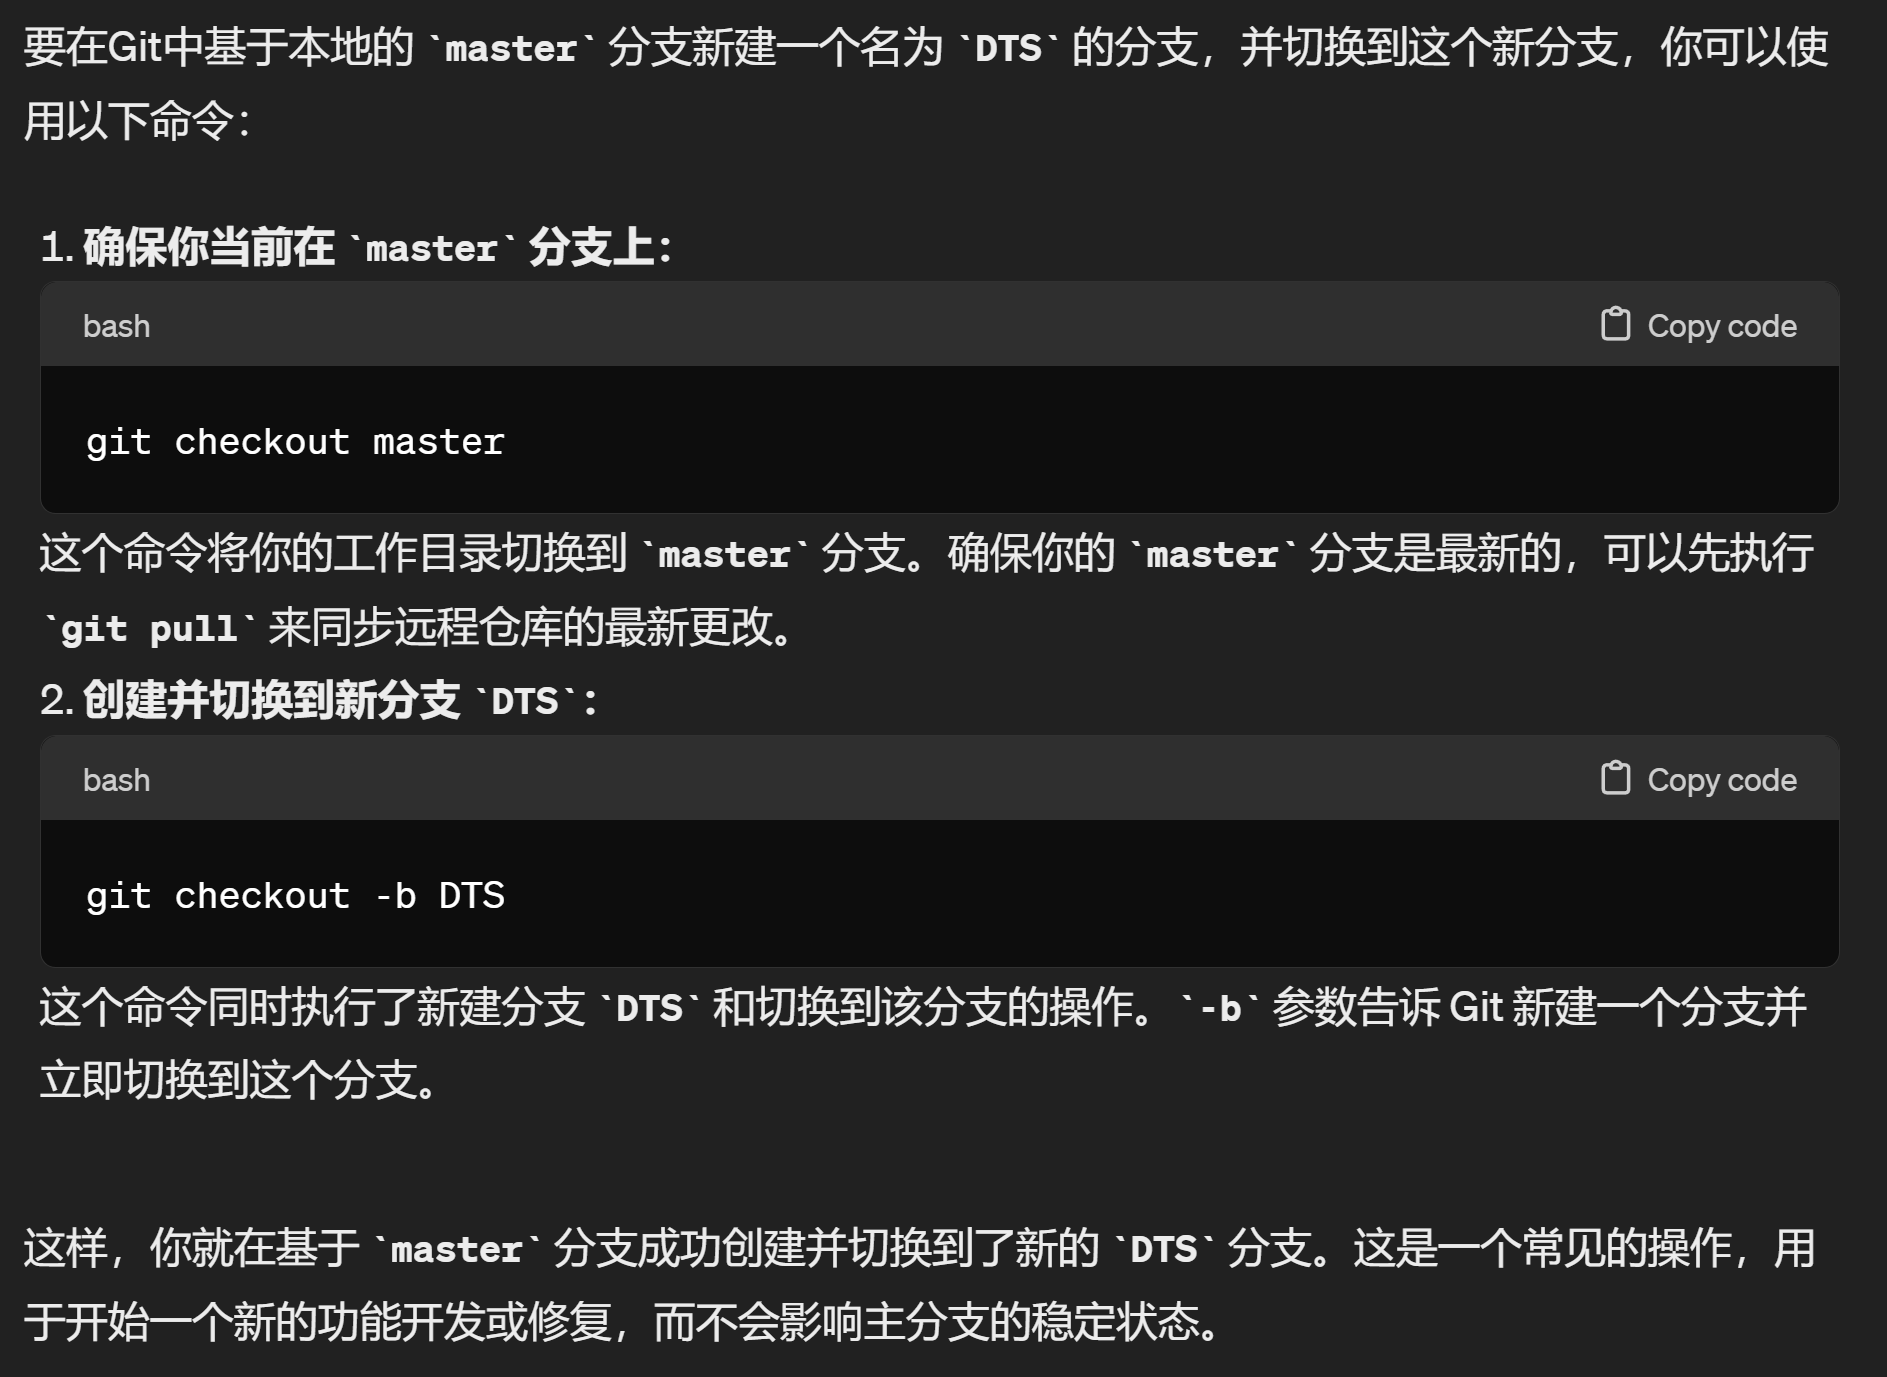
基于本地分支master,新建分支DTS并将分支转到DTS的命令行是:
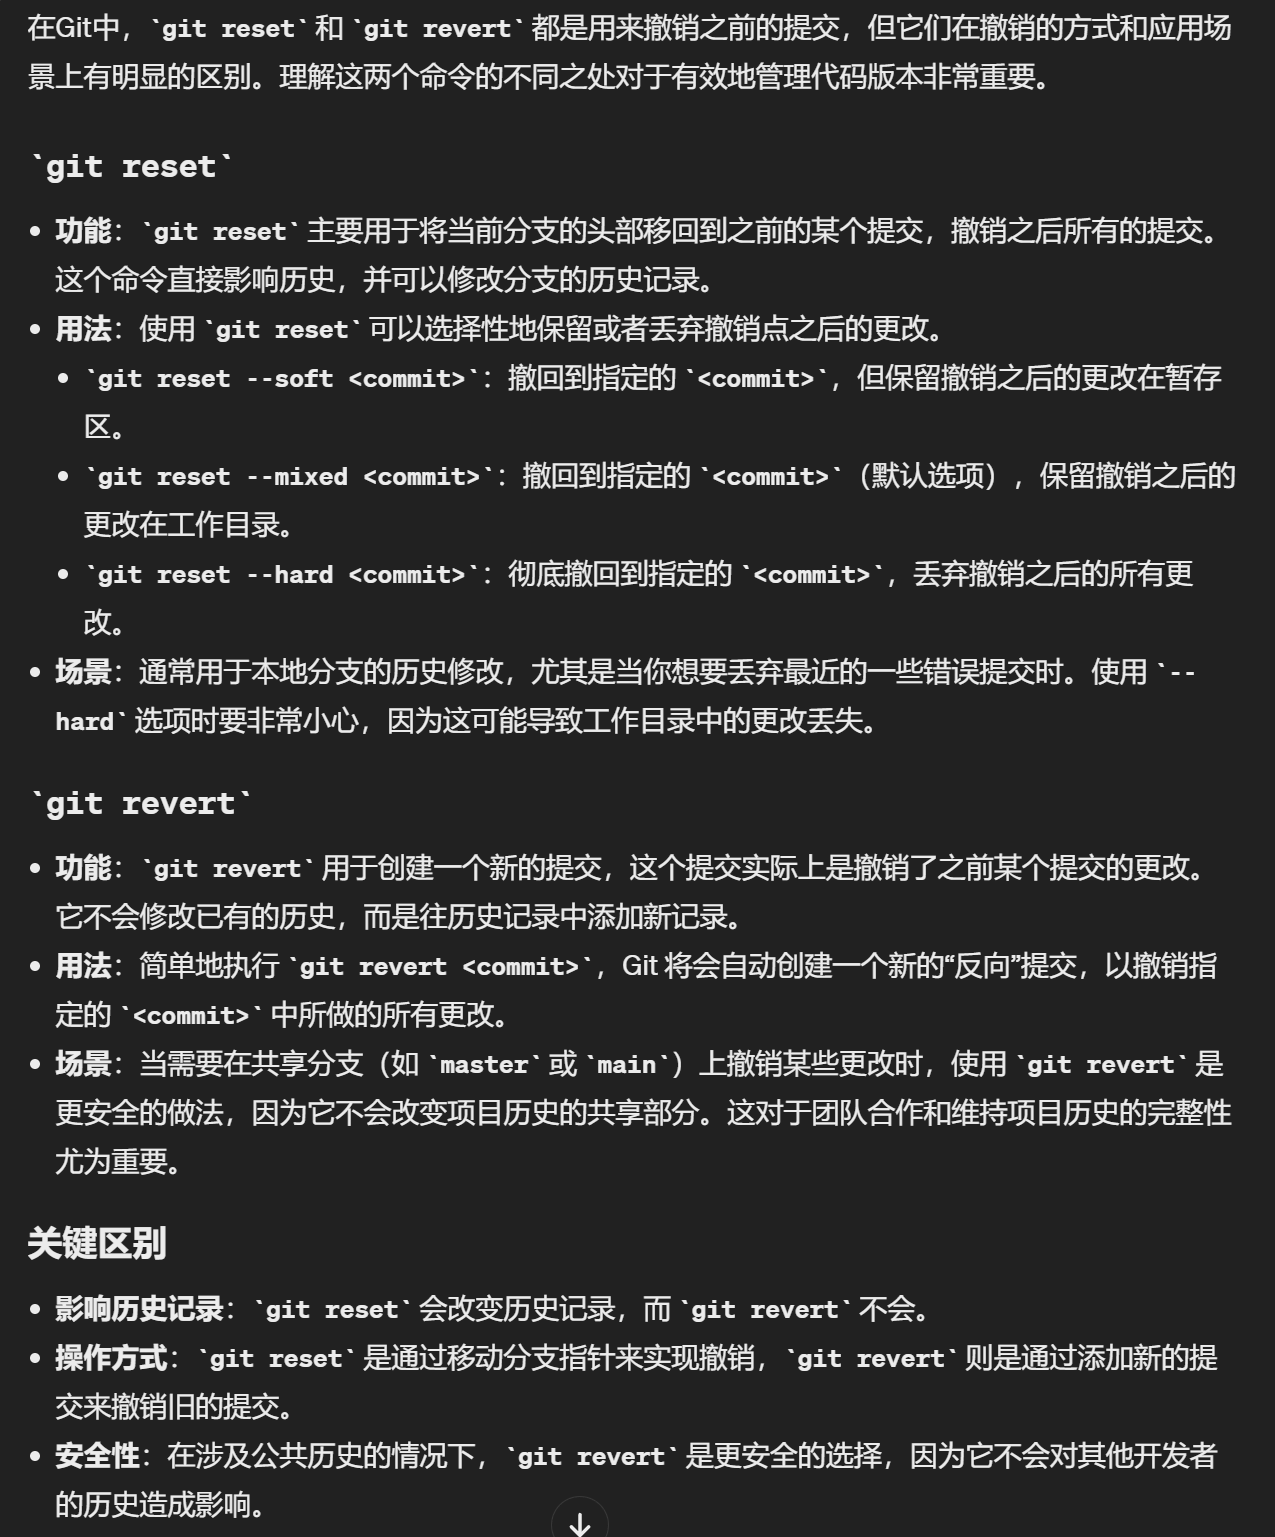
# git reset和git revert
# git checkout
git checkout HEAD -- hello.c
这个命令的作用是将特定文件(在此例中为 hello.c)恢复到最新提交的状态(HEAD 指向的状态),即撤销在工作区对该文件所做的所有未提交的修改。
# slots节省内存
class Test(object):
    __slots__ = ['a']

if __name__ == '__main__':
    t = Test()
    t.a = 1
    Test.c = 3  # 类属性仍然可以自由添加
    print(t.c)  # 输出:3
    t.b = 2  # AttributeError: 'Test' object has no attribute 'b'
2
3
4
5
6
7
8
9
10
python的类在没有定义__slots__时,实例的属性管理其实依赖字典, 也就是魔法属性__dict__,它其实就是个存放实例所有属性及对应值的字典。需要注意的是,定义了__slots__的类实例不再拥有__dict__属性。 在python中字典的内存分配规则是,先预分配一块内存区,当元素添加到一定阈值时进行扩容再分配一块比较大的内存区,由此可见__dict__存储属性会预留比较大的空间,因此会存在比较大的内存浪费。 __slots__的做法就是在创建实例之初就按照__slots__中声明的属性分配定长内存,实际就是定长列表,因此会更加节省内存。
总结一下实际使用中应该使用__slots__的场景:需要大量创建固定属性的实例时。
ref:https://blog.csdn.net/weixin_39253570/article/details/113894981
# 装饰器
from functools import wraps
def decorator_name(f):
    @wraps(f)
    def decorated(*args, **kwargs):
        if not can_run:
            return "Function will not run"
        return f(*args, **kwargs)
    return decorated

@decorator_name
def func():
    return("Function is running")

can_run = True
print(func())
# Output: Function is running

can_run = False
print(func())
# Output: Function will not run
2
3
4
5
6
7
8
9
10
11
12
13
14
15
16
17
18
19
20
# 带参数的装饰器
from functools import wraps

def logit(logfile='out.log'):
    def logging_decorator(func):
        @wraps(func)
        def wrapped_function(*args, **kwargs):
            log_string = func.__name__ + " was called"
            print(log_string)
            # 打开logfile,并写入内容
            with open(logfile, 'a') as opened_file:
                # 现在将日志打到指定的logfile
                opened_file.write(log_string + '\n')
            return func(*args, **kwargs)
        return wrapped_function
    return logging_decorator

@logit()
def myfunc1():
    pass

myfunc1()
# Output: myfunc1 was called
# 现在一个叫做 out.log 的文件出现了,里面的内容就是上面的字符串

@logit(logfile='func2.log')
def myfunc2():
    pass

myfunc2()
# Output: myfunc2 was called
# 现在一个叫做 func2.log 的文件出现了,里面的内容就是上面的字符串
2
3
4
5
6
7
8
9
10
11
12
13
14
15
16
17
18
19
20
21
22
23
24
25
26
27
28
29
30
31
# 装饰器类
from functools import wraps

class logit(object):
    def __init__(self, logfile='out.log'):
        self.logfile = logfile

    def __call__(self, func):
        @wraps(func)
        def wrapped_function(*args, **kwargs):
            log_string = func.__name__ + " was called"
            print(log_string)
            # 打开logfile并写入
            with open(self.logfile, 'a') as opened_file:
                # 现在将日志打到指定的文件
                opened_file.write(log_string + '\n')
            # 现在,发送一个通知
            self.notify()
            return func(*args, **kwargs)
        return wrapped_function

    def notify(self):
        # logit只打日志,不做别的
        pass
2
3
4
5
6
7
8
9
10
11
12
13
14
15
16
17
18
19
20
21
22
23
优势:可以有子类,添加发送email方法
class email_logit(logit):
    '''
    一个logit的实现版本,可以在函数调用时发送email给管理员
    '''
    def __init__(self, email='admin@myproject.com', *args, **kwargs):
        self.email = email
        super(email_logit, self).__init__(*args, **kwargs)

    def notify(self):
        # 发送一封email到self.email
        # 这里就不做实现了
        pass
2
3
4
5
6
7
8
9
10
11
12
详见:https://www.runoob.com/w3cnote/python-func-decorators.html
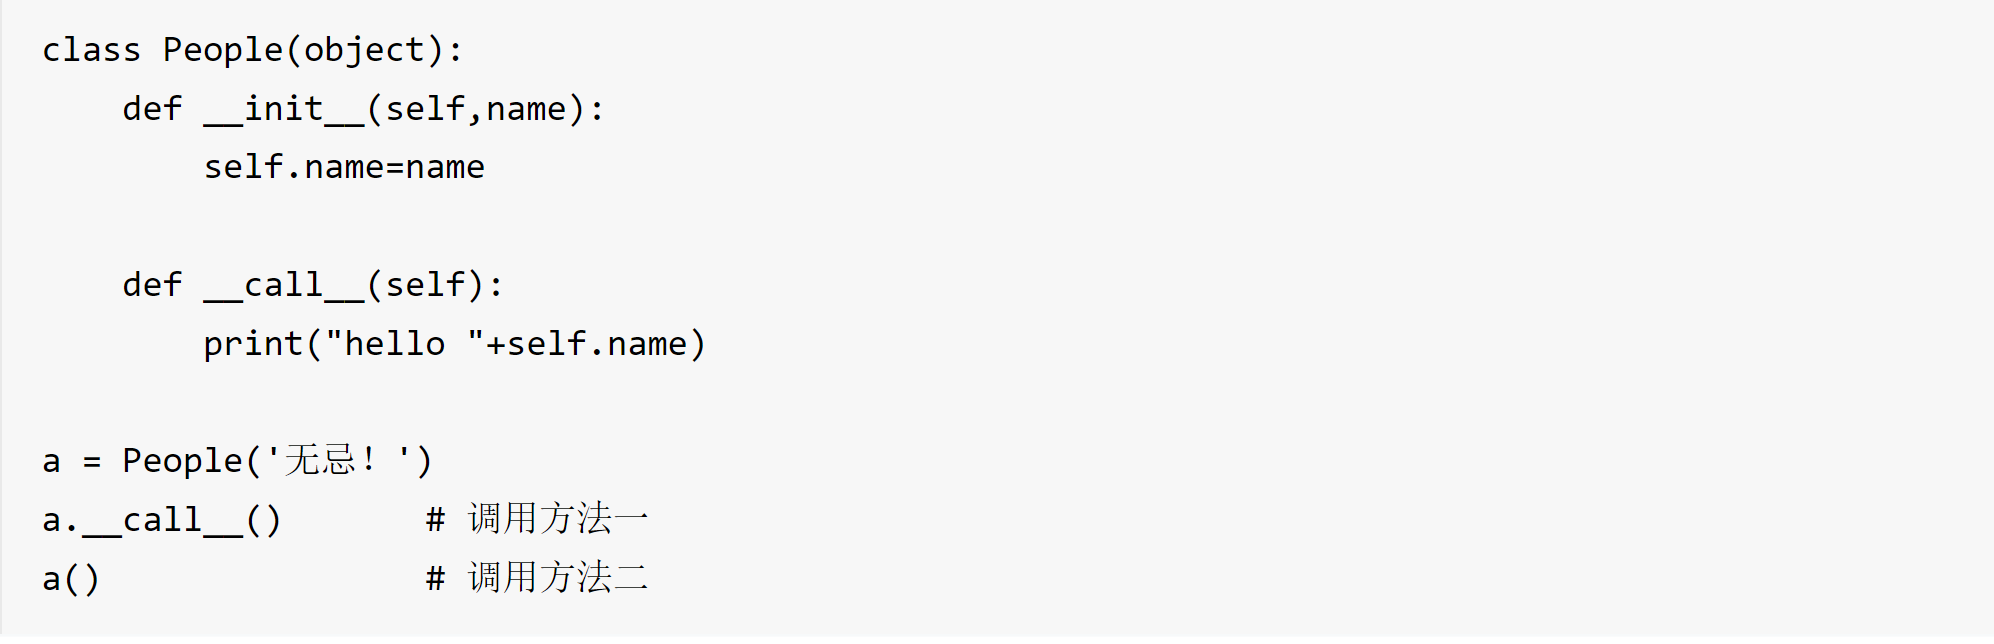
# call 方法
使得类实例对象可以像调用普通函数那样,以“对象名()”的形式使用。作用:为了将类的实例对象变为可调用对象。
# 测试